Monday 28 October 2013

Yet another benefit to Aloe Vera gel...

Hello everyone, 

Over the weekend, I went to a Halloween party & the morning after I was feeling a little hungover! So I googled "will Aloe Vera gel cute a hangover?" And I came across a blog which informed me that it would! 


As some of you probably know, I have my own business retailing Forever Living Aloe Vera products, so I already drink the gel daily. I was just unsure if it would make me feel worse or better! So after googling, I thought I would give it a go and my hangover literally went within half an hour, if that! I love finding new uses for my products & I generally love them! They are great. 

This is why it works to cure that hangover: 

It metabolises ingested alcohol, via oxidation in the liver, before it leaves the body. 

So the benefits of Aloe Vera gel: 

- Gets rid of those dreaded hangover symptoms 

- Aloe vera converts ingested alcohol into un harmful substances in aid for proper and fast digestion

- Eliminates dehydration and therefore dry mouth symptoms and headaches

- Relaxes nerves & helps you to feel sober & calm

So now you know the product you need to cure that hangover next time you experience one. I can honestly say I was amazed & thrilled I could cure it! Only one product can do all this for you- Aloe Vera gel. 

For any further enquiries email: saffy_13@hotmail.com 

Thanks for reading,
Saffron xoxo 

Thursday 24 October 2013

Aloe launch!

Hello everyone, 

Just a quick update to share my excitement as I have launched my Forever Living Aloe Vera business tonight!! It was such a fab night with trying out products, wine & nibbles!! 

We let everyone know about the business and what our Aloe is about and how all of our products are straight from the Aloe leaf so have so many benefits!! Then we passed around the products for everyone to try for themselves, held a prize draw where guests could win either a product or £5 off their order, then everyone got the chance to place their order if there was anything they fancied. 

It was both an enjoyable and also successful evening. If any of my readers are interested in learning any more about the business opportunity or our Aloe products then please let me know! 

Thanks for reading,
Saffron xoxo

Tuesday 22 October 2013

Teeth whitening review & results

Hello everyone :-),

I said I would give you an update on my teeth, so here it is after my 7 day treatment:

I am so pleased with the results!! They are whiter than white & a big change from my before pic (on previous blog). They also feel so smooth & I have had no sensitivity at all.

The treatment itself is very easy to do. I struggled with keeping the strips on my teeth on the first night as I had cut the strips too small. I learnt to leave the strips at their full size to keep the gel securely on the teeth. For those who have not read my previous post, the set I bought is called 'pro teeth whitening' & I bought it at a discounted price (£30, usually £59) at the Professional Beauty Show North. I would recommend this set to anyone. 

If I am honest, I expected it either to not work or it to damage my teeth with it being so affordable. But as I said before, it has definitely worked and I have felt no sensitivity. 

All you have to do to do the treatment is keep the gel in the fridge in order to keep the gel active. Then, using a cotton bud, apply the gel evenly over dry teeth and cover with one of the included strips do that you can close your mouth and continue normally. You leave the gel on for 30 mins and repeat this daily for 7 days. You can continue for a 14 day programme or a 28 day programme (for those who do get some sensitivity). 

Has anybody else tried a home whitening treatment like this before? 

Thanks for reading,
Saffron xoxo 

Monday 14 October 2013

Professional Beauty North

Hello everyone :-)

Today I went to the Professional Beauty North in Manchester. It was a two day event showcasing loads of new products and techniques. There were stalls which sold stock for beauty salons, there were fake tanning stalls, a HD brow centre and also show areas where you could watch demonstrations etc. 

We got there for when it opened at 10 so we could have a good look around before Uni. We went looking to learn about new beauty products and to hopefully get some bargains for ourselves!

 I wasn't disappointed but I'm glad we went early, it got absolutely packed towards mid morning and I don't think I could have stood that the whole time. However, it didn't ruin the morning at all! The atmosphere was great with loads of people into the same things as you are. 

I treated myself to some lash extensions, some china glaze autumnal nail polish, a home teeth whitening kit AND I finally took the plunge with the HD brow treatment! Here are my purchases:

I have been wanting it done for a while and finally went for it. It was only £35 for the treatment and you also got a £5 discount off any products with it too! I absolutely LOVE the results, have any of you had the treatment done? What do you think? Here are my before & after photos....
Before HD brows:
After HD brows:
I love how you can see little hair lines to make them look more natural! I am going to use the HD palette to make them a little darker as that is just my preference but I'm definitely a fan. They change the whole look of your face and I love the shape! I really didn't think my brows could look like this. 

It was also a really quick, painless procedure of tinting, waxing, plucking and threading. My therapist also gave me tips on how to best grow my brows for my best shape. So it was great! I would definitely recommend. 

I am also going to do a future blog of my results from my 7 day teeth whitening home kit for you when I get to the end of my 7 day treatment. I have done the first day today and can already see the results, so I can't wait until after a week of treatment! 

Before teeth whitening...
After day 1 of treatment....
I can already see results!!

I know my teeth weren't too bad to begin with but I can see the beginnings of tea stains on them so I wanted to get them gone while I'm ahead! My teeth also feel so smooth and I have not yet experienced any sensitivity so fingers crossed. I will keep you posted! 

Thanks for reading,
Saffron xoxo 

Thursday 10 October 2013

Cosmo Careers

Hello everyone, 


Last night I attended the Cosmo Careers Masterclass in Manchester. It was for people interested in working in fashion, whether it be designing, PR, journos etc.... So I met some fab people & saw loads of fabulous outfits! 


On arrival we had champagne and mingled with everyone for half an hour. Then we were taken into the lecture theatre where we saw an amazing panel of: the Cosmo editor, a designer for Missguided, a buyer of luxury labels, a PR from BooHoo, a fashion journalist who is known for her Catwalk to Curvy column in Cosmo and finally, a PR from Gorgeous Couture. 

What an amazing panel!!

We also saw out fabulous goody bags laid out ready for us. 


The talk began with the panel introducing themselves and then editor Louise asked the panel a series of questions which would give the audience some great insights into the industry and their best advice and tips. We were given insights into where they began and how they worked their way up, tips for CV writing, interviews.... A whole raft of information. It was all so inspiring! 


At the end of the session, they opened up for the floor for half an hour so that we could ask them any questions we may have. This was great and made the session really personal. 


Even though some of the information given didn't directly apply to my field of PR (if it was a design question for example), it didn't matter! You could apply a lot of the information to the PR field anyway and it was valuable to get an insight into the fashion industry as a whole too. 


It was a thoroughly enjoyable night which ended with the opportunity to walk up to the panel at the end of the session for any final questions. One of the main bits of personal advice that has stuck with me is to always be open to learning new things. I think sometimes when you are going to interview, you feel like you need to know everything, where in reality- you don't! The industry is constantly changing so there is no way that you will ever know it all.


Definitely keep an eye out for future Cosmo Careers events- you meet a fantastic panel, people and walk away with some priceless advice! 


Thanks for reading,

Saffron xoxo 

Monday 7 October 2013

Dressing for success

Hello :-)

To start this post, if you don't follow @PRDiva on twitter- you really need to! Her tweets & blogs are funny, educational and stylish. 

This week I have noticed her blog about 'Dressing for success- The Publicist's wardrobe'. 
Link:

I found this post very useful as I am just starting my professional wardrobe and it's always great to get some guidance! 

She lists a number of professional must haves for the PR wardrobe:

These are my 6 Do-or-Die Pieces for the communications professional:


1. A great pair of Jeans – They can be from Target or they could cost a car payment. As long as you are comfortable and you can either dress the jeans up or down, a great pair of jeans is a must. From those Saturday morning pre-event planning I’m-on-my-hands-and-knees-doing-what moments, a great pair of jeans can be your saving grace. Oh, and make sure they make your bum looks good in them and aren’t “Mom Jeans”. I can write an entire post on that alone!


2. A tailored suit – My grandmother had many fabulous, tailored pieces. I never understood why she was so adverse to “buying off the rack” but little to my knowledge (hey I was young) she sometimes bought off the rack and had it tailored to her fit. I have learned that tailored items make the woman. Nothing says LOVE like sliding into a suit jacket that fits you perfectly and doesn’t make you look like you are about to HULK out of it or are playing pretend in your mother’s dress clothes.


3. An umbrella – Who wants to look like a drowned rat at a client meeting? Wait, who wants to look like a drowned rat period? Purchase a small umbrella that is convenient enough to tuck into your handbag or briefcase. Technically an umbrella isn’t a wardrobe necessity but an accessory. Trust me, an umbrella is a must or at the very least a poncho. Ok, scratch the poncho idea.


4. Little ” ” dress – For me, a little black dress is great but a little ” ” dress is fabulous. If you want to wear color, wear color. Wear what you feel comfortable in but just make sure it looks professional and sophisticated but most importantly feel like a million dollars in.


5. Classic white shirts – I used to loathe white clothing. Abhor it! But as of late, I have come to realize the versatility of a classic white fitted tee or a white button down shirt. White shirts can be worn under blazers, under sweater, or by themselves. Pick out a few white shirts–they don’t even have to be “classic”.


6. THE HANDBAG – Or the briefcase. Make your personality shine with a statement piece or go classic. If you are usually a bit more conservatively dressed, hit them with a killer handbag but make sure it is useful and not totally for show. You are going to need it to fit in things for your arsenal (smart phone, tablet, etc).


One of the things which I have already discovered for myself is the importance of a good size handbag. When I started my career in PR, I began with a small bag and quickly discovered that this wouldn't be sufficient! So I swapped it for a medium size bag which too wasn't big enough, so at the weekend I am treating myself to a large business bag which is stylish but also functional! 

I have found an umbrella a necessity too! Particularly in Manchester! I have also got a fab tailored jacket from H&M (pictured...)
I love this piece as it smartens my outfits up and goes with pretty much anything! 

What do you consider to be professional wardrobe must haves? 

Remember: if you don't look like you look after yourself, your clients won't think you can look after them! 

Thanks for reading,
Saffron xoxo 

Friday 4 October 2013

Smokey eyes

I love the smokey eye make up look for autumn winter! I in fact wear this look pretty much all year round but just use lighter shades in the spring/summer months. 

Above is my lighter shade smokey eye look. I know it is not the traditional smokey eye, but I still class it as a smokey eye due to the black liner and darker shade on the crease of my lid. 

For this look, I firstly fill the inside of my eyelid with Rimmel black kohl eyeliner. This really helps to bein out the colours in my eyes. I then use my MAC eyeshadow brush to apply a matte gold colour out of my Kardashian Beauty Khloe palette. I then apply the light shimmer over the top, from the same palette. I finish off the shadow with the light brown colour from the kardashian palette in the crease of my lid and also spread it out a bit towards my brow bone at the edge of my eye. I then apply the black kohl eyeliner into a cat eye look to finish it off and apply a light shimmer around the corner of my eyes to brighten them. I like a lot of mascara so I also apply a lot of that too. This picture below illustrates how I do this look...


For the traditional smokey eye look, I searched online for inspiration. I found a couple of pictures which helped me to achieve the look....
I would wear this make up in the evening when going out. I personally feel it is too harsh for every day wear and enjoy dramatising my look for night time. 
Pictured here is my evening meal smokey eye look, using the same Kardashian palette as listed above and using the same method but with the darker shades. I also apply lashings of mascara. 

For a meal, I don't go too dark with my smokey eye look, but for a night out I would go even darker and use false eyelashes too! I will post this look at the weekend as I use a different palette for this make up. 

What kind of look is your favourite?
Thanks for reading,
Saffron xoxo 


My fave PFW looks on & off the catwalk

Hey guys & dolls :-) 

I have found myself completely inspired with some of the looks at Paris Fashion Week this year. I am not usually a massive fan as I find almost every designer had wayyy too much fur in their collections- and I am completely against real fur! 

However, this year I have been presently surprised at the amount of fur on the catwalk- what I like to see! So, my favourite designer of the whole week has to be Stefano Gabbana! I can't even tell you how much I love his looks and his finale was absolutely amazing! Here are a few of my favourites....
I absolutely LOVE the designs... The prints... Everything!! What do you guys think? 

This was the amazing finale....

(Apologies that they are Instagram screenshots- but I wanted the pictures straight from Gabbana himself!) 

I also fell in love with this-
It's obviously not from PFW but I just love the picture and the outfits. I am in LOVE and obsessed with the whole collection. 

I am still in complete awe of my usual culprits at PFW off the catwalk! Miranda Kerr & Kim Kardashian! 

How amazing does Miranda look?!
And I am loving Kim's new laid back style...

I also thought her make up was amazing here...
As it is such a change for her! Probably one of the most dramatic make up looks I have ever seen her with. The dress is pretty amazing too...
If not a little too booby! She somehow manages to pull it off in a classy way. 

I would just like to finish with a picture from one of my other favourite designer's collection this year- Stella McCartney...

AMAZING!! 
What have you liked from Paris fashion week this year? 

Thanks for reading,
Saffron xoxo 

Monday 30 September 2013

Nivea in shower moisturiser

Nivea in shower moisturiser is my new favourite product! I thought this would be one of those products that shouldn’t work but it actually does! When I first saw this advertised I thought it was a great idea and a time saver but I wasn't sure if it would really work. 


I get really itchy skin if I don't moisturise after a bath/a shower so I was sceptical whether this would still leave me with itchy skin after drying myself. I have quite sensitive skin anyway and Nivea products have always suited me, so I thought I would give it a go!

I bought it last weekend and have used it ever since. If you have dry skin then it may not be nourishing enough alone but for normal skin like mine it’s great. I have been using the almond oil formula for dry skin and have not yet tried the one for normal skin. But the dry skin version is extremely nourishing and leaves your skin feeling so nourished without any residue! I love this because I can get dressed and going straight away!

I would definitely recommend this product if you want speed but still the feel of nourished skin. You wash your body with your normal body wash, then apply this when you are ready to leave the shower- simply rinse off, dry and go! 

The price is £3.65 for 250ml and £5.15 for 400ml. I normally buy this in asda but I found it at a steal price in home bargains for £2.99. 

Definitely try it out and let me know what you think :-) 


Saffron xoxo

Friday 27 September 2013

What are your breakouts telling you?

Hello everyone, 

I came across an interesting post on Lauren Conrad's blog (www.laurenconrad.com), which tells you what your breakouts mean! I am usually not someone who has breakouts very often but lately I have been getting them which drew my attention to this post. The post can be found at: 

Have a look guys and girls. Even if you are not someone who suffers with regular breakouts, you will still find the post very interesting as it talks about the Eastern tradition of face mapping. 

Let me know what you think,
Saffron xoxo 


Wednesday 24 July 2013

Sonic bonded extensions

Hello guys & dolls :-)

Since my last blog I have had some hair extensions! I have wanted them for so long but haven't dared to because of ruining my natural hair with it being so fine. But I discovered 'Holly Williams hair extensions on The Wirral' on Instagram, her work looked amazing when she posted before and after photos. So I clicked on the pictures I liked to see which methods she used. She uses weaving, gluing etc but I also saw that she did sonic bonds. I didn't know what these were, but I was informed that they are a long lasting bonding method which doesn't have the same strain on your natural hair. 

So I made the decision to have them! Here is my before and after photo (apologies for the low quality pic- was taken on an iPhone). 
She uses varying quality and length of hair. I chose 22" AAAA grade extra volume with the ultra sonic bonds. They were also very affordable! I am so pleased with the results and they are easy to look after. 

The only things I have to do, is wash it 2-3 times a week and make sure I dry the bonds as if I don't it could weaken them. Also brush them carefully and I choose to treat the ends of the hair with argan oil before I brush it through.

I love my hair! What do you guys think? 
Saffron xoxo 

Sunday 21 July 2013

Celebrity fashionista

Hello :-),

I am always looking online for new styles/ outfits to imitate. Today I found a fab site that I wanted to share with you guys:

www.celebrityfashionista.com

It is a site which lists recent celebrity outfits and where to buy the pieces from. I search for the Kardashians in particular as I love their style, not only because the pieces are amazing but also because they dress for a similar shape to me. There is a whole section on kardashian style, sectioned under each sister. I am liking kourtney's style in particular at the moment, but I tend to alternate between Kim or kourtney!

Have a look :-) I think we all need a bit of style inspiration at times. So enjoy!

Saffron xoxo

Wednesday 3 July 2013

Forever Living

Hello :-)

Hope you are all well and have a fab day. I am feeling excited about two new opportunities which have come my way! Today I have a Skype call with one of my friends from school who is a distributor for 'Forever Living' aloe vera products. She is going to tell me about all of the products and I am hopefully going to become an ambassador of it myself!
Here are some of the products, they do weight loss products, skin products and all sorts! I am very excited about the opportunity and can't wait to hopefully get started.

I have also been approached to do a product review on an up and coming craze called 'LVL lashes'. It is an alternative method to lash extensions using a special gel which provides clients with longer lashes which lasts up to 6 weeks. The treatment takes just 45 minutes and the results are immediate. LVL uses silicone shields which are very comfortable and straightens and volumises the lashes. Here are some of the results:


I am going to have the treatment done myself and I can't wait to show you guys the results and do a product review on LVL lashes. They are said to be set to be the next big thing so watch this space!

Thanks for reading,
Saffron xoxo

Monday 1 July 2013

EYLURE and BRIT ROCKS false eyelash review

Hello :-)

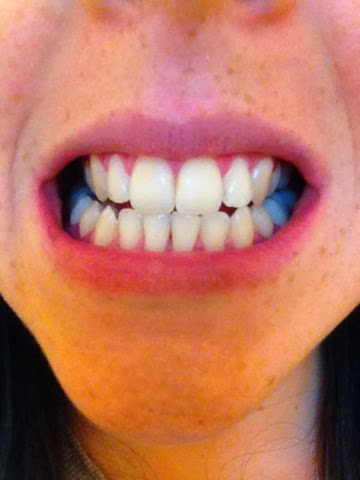
While I have been away I have had a sudden urge to buy false eyelashes again after a break from them! A while ago I wore them every day as part of my daily make-up, then I went through a phase of wearing them just for nights out, then I finished my false eyelash phase with individual lashes being professionally applied for a holiday (and this was about a year ago!) So quite a big break from them! I am pretty lucky with the length of my eyelashes (pictured below) anyway but it is always nice to add a bit more thickness to my natural lashes. Apologies for the tired eyes- little Daisy has left me sleep deprived of late! :-)


Women with short of sparse lashes will definitely be impressed with the result of a set of false eyelashes. These lashes are available in all sorts of different looks, styles and forms. I usually stick with the basic strip lashes which fit along your top eye lid. Other options are individual lashes (which can be applied yourself using tweezers), bottom lid eyelashes and strip lashes with a bit of extra something such as gems or sparkles! A good range of false lashes are 'Eylure', they produce lots of different styles, lengths and options of lashes. There are even different takes on the basic strip lashes too, such as more natural looking ones, varying lengths of lashes and my personal favourite 'intense' (pictured below). Strip lashes are the ones I tend to buy and are very quick and easy to apply and are great for women with short, sparse eyelashes with no or little gaps in your own natural lashes. If you are a lady with gaps in your natural lashes I would recommend the individual lash sets to make the finish more natural.


As the box states, these lashes are by 'Eylure' from their 'Naturalites' range: 'Intense: Ultra full lashes for an intense effect' and come with the lash adhesive. The average price of a set of this range of lashes is about £4, certainly no more than £5 depending on where you purchase them from. These are my personal favourites- they might be too much for some people but seeing as my lashes are quite long already I like these because you can actually tell the difference when I've got them on! They are very easy to apply following the steps on the back of the box, however I don't think the picture steps are the most helpful so I have written the steps that I follow to put the lashes on:


  1. Gently peel lashes from box (selecting which eye you would like to do first using the right and left eye indicators on the lash box). Ensure the lashes aren't too wide for your eye by holding the lashes (dry) up to your eye. If they are a bit too wide, just trim them with scissors and begin the application process.
  2. Apply a small amount of the lash adhesive along the black strip of the lashes.
  3. Allow glue to dry a little bit so it is tacky to touch (I speed up this process by gently blowing along the glue).
  4. When the glue is tacky, carefully hold the lashes by the lash tips, close your eye and apply to your natural lash line, paying extra attention to pressing either end of the strip onto your eye lid to ensure attachment.
  5. Carefully press along the whole line of the strip to ensure all is secure.
  6. When all is secure, squeeze along the lash line to stick your natural and false eyelashes together for a more blended finish.
  7. (optional) Depending on the look you are going for, I always apply some mascara to the lashes too as I go for a more dramatic look.
  8. Enjoy your fabulous lashes!
To remove, all you have to do is gently peel them off from one corner. I find these lashes extremely comfortable to wear and they do not cause me any discomfort. The glue is also very good and my lashes have never fallen off or began to peel off using this glue. In fact, I use this glue even when wearing a different range of lashes as I will tell you about next!


As I said above, my favourite range of lashes is 'Eylure', but I decided to try out a new set to see if I liked them just as much. The answer is no! I tried the 'Brit Rocks' range (pictured below), using the 'eyeluscious' set.

The lashes themselves look beautiful inside the box- very flirty! This is what attracted me to buying them. However, when I removed the lashes from their box they had a very plastic feel, not like the natural feel of the 'Eylure' range. But I thought I would try to apply them anyway and hoped for the best! I applied the glue (included) to the lashes and allowed to get tacky as in the above steps and began to apply as normal. But the lashes simply wouldn't stick! After about 5 attempts I gave up and stuck to my natural lashes for the day! I think it was a combination of the glue not being strong enough and also the lashes being too stiff which made them not want to stick. I didn't want to give up on them that easily because the lashes themselves are beautiful, so I went out and bought another set of the 'Eylure' lashes just to use their glue!

So I tried to apply the 'Brit Rocks' set again using the 'Eylure' glue and they thankfully stuck! I was relieved and went out. About half an hour later, the corners of the lashes began to lift, so I applied some more glue and it lasted for a little bit longer again. But all night they continued to lift and because I was applying so much glue, they were beginning to irritate my eyes, so in the end I took them off! I find the lashes are too stiff and plasticy to hold and because of this, every time you blink, the stiffness of the lash strip begins to lift the lashes off. Having said this, my friend uses these lashes all of the time and they fit fine with her! I am determined to make them work as they are beautiful but perhaps the shape of them just doesn't suit my eye lid! I will keep you posted on my progress!

Thanks for reading and I hope it has been helpful :-)
Saffron xoxo

Wednesday 12 June 2013

Wedding inspiration

Hello everyone :-)

Today I am going to do a quick lifestyle/style post as I have been quite focused on the beauty side of things lately. Well, my partner and I recently set a date for our wedding (July 19th 2014) which is of course very exciting! The first things which crossed my mind were, the venue, the theme and of course the dress! We have decided on our venue, a gorgeous farmhouse locally, so that was one thing sorted. Then I have been looking online for inspiration for themes and we have decided on lilac and cream. Here are some of the pictures which are helping me to design our venue dress:


What do you guys think? 
I personally love these colours together, I think they are really classic looking and chic. 

I am still looking for wedding dresses, so I will post when I have found some styles that I really like. But I am hoping for a tight bodice with sparkles and a big princess skirt :-). 

Is anybody else getting married soon? If so, what theme have you chosen?

Thanks for reading,
Saffron xoxo

Wednesday 5 June 2013

OPI Nail Envy 'Perfect Couple'

Hello :-)

For today's blog post I am going to focus on my nails. Recently I purchased a new set from OPI named the Perfect Couple, containing Nail Envy and also the Avoplex cuticle oil.
This set cost me £18.95 from a local beauty store but I have seen it being priced from £18.00 right up to £32.50 online!! So make sure you shop around a bit to get a good price. I have used OPI Nail Envy before after seeing it on QVC and I have always been very pleased with it and see what a difference it makes to my nails almost straight away. I have tried the original version (pictured above) and also the matte version and I definitely prefer the original as I found the matte goes a bit cloggy and sticky after a while. So i definitely would recommend buying the original over the matte version, buying the original also makes a great top coat as it leaves a really shiny finish which is what I prefer on my nails. However, both do give the desired result of growth and strength in the nail so I guess it all depends on which kind of finish you prefer.
The  cuticle oil is also great and helps encourage the nails to grow and keep the nail bed looking healthy. Whenever I go and have a manicure at a beauty salon, the beautician always comments on how healthy my cuticles look! Although it is oil, it doesn't feel greasy for ages and ages so you can quickly get on with things. I usually apply the oil at night just before I go to bed around my cuticles so I can leave it to soak in. But if you do use it during the day, you can massage it into the cuticles to get it to soak in quicker. I think this oil smells so lovely too! It makes you feel very pampered.

So I thought I would post a few pictures on how I would usually use the above products:

Firstly I apply one coat of the original Nail Envy onto my nails. It says on the bottle to apply two coats, but when I am using a colour I do one coat as a base, then the colour, then use the second coat of my Nail Envy as a top coat. If I wasn't going to use colour, I would just apply two coats of the Nail Envy.
This is what it looks like after the first coat- nice and shiny. My nails are quite short at the moment because I (regrettably) haven't used this product for a while. But I know that it will quickly show results.

I let this base coat dry, then I apply my chosen colour. Today I have chosen 'Dutch Tulips' as it is for once sunny in the UK and this colour is lovely and vibrant.
So I again apply one coat of this, leaving this result:
I love how shiny it is and OPI polish is so easy to apply as most of them have the wide brushes which means that usually you only need one stroke on each nail! This is the result after one coat, sometimes I would do two coats of colour depending on the shade.

I then do my second coat of OPI Nail Envy over the top as my top coat. Nail Envy recommends you to do a new coat every other day, then after 7 days, remove and start again.
After this, I apply the Avoplex cuticle oil around the nail bed and massage it to soak it in.
I put this on daily!
I then put on my Burt's Bees hand balm :-)
That's it!!
Thanks for reading,
Saffron xoxo